The assessment configuration allows you to configure the testing parameters.
To prevent cheating Glider allows you to capture the screen and record the video of the test taker. You can also limit the number of tab switches.
Setting the test duration, shuffling questions, enabling randomization of questions, adding clear instructions to the candidates and a lot more can be done in the configuration.
Click on the Automatic settings of the assessment and go to Configure to see these options.
1. Basic Settings
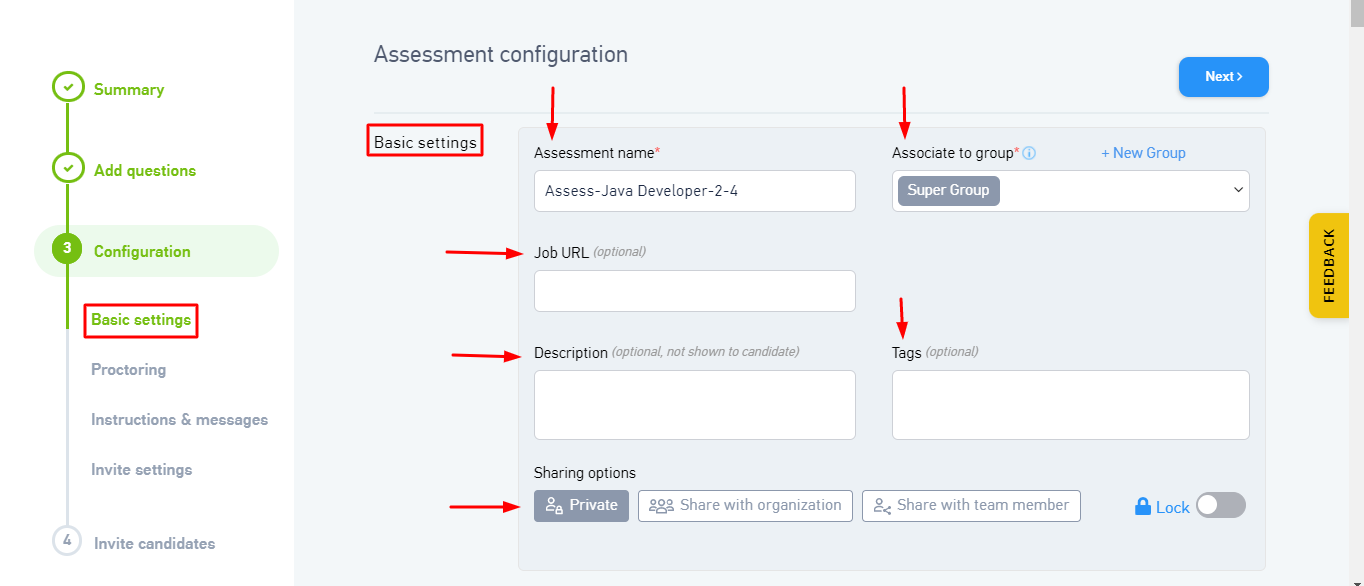
- Assessment name: Add the assessment name.
- Associate to group: Associate the assessment to any group if required. This is for internal purpose!
- Job URL: Add job URL , how ever it is optional.
- Description: Add the description of the job
- Tag an assessment to search and filter assessments better. Tag assessments with job roles, difficulty levels or skills so that they come up when searched in the library by you or your team members.Tags can be words or phrases.
- Sharing Option: You can also share an assessment with your organization (team members on Glider) by clicking on Share with the organization. Your team members can view the assessment, the candidate information in the assessment
Note: You can also save time by reusing the questions in the assessment with the duplicate assessment capability later once the assessment is created. - Lock Assessment: You will find the lock button adjacent to the sharing options. You can lock an assessment so that other users will not be able to make changes in the assessment.
- If the assessment author locks the assessment then all the options in the summary and configure tab will not be editable to other team members.
- The options to add/remove questions from the questions tab will not be seen and question time and points will also not be editable.
- A lock icon will appear beside the assessment name in the assessment dashboard
- Only the author of the assessment and the admin can make changes in a locked assessment.
2. Proctoring
If the Glider tests are taken remotely by the candidate and you think it is important to monitor these tests, the proctoring feature gives you various options.
- Capture candidate’s picture - Enable this option if you want to take a photograph of the candidate before the assessment starts. The same will be used as a candidate's profile photo for all future references.
- Enable facial match - Enabling this option will help you identify duplicate submissions by analyzing all the candidate submissions for the assessment through facial matching.
- Enable facial match comparison with past attempts: Enable facial match comparison with past attempts to verify whether the candidate’s picture matches the images from their previous assessment attempts. This helps confirm candidate identity and ensures consistency across multiple attempts.
- Capture Candidate's identity proof - Enable this option if you want to capture the candidate's identity proof details, here you have the option to capture the number or number and picture of the selected identity proof.
- Enable ID Proof image masking - Enable ID proof image masking to protect sensitive candidate information in assessment reports and PDF files. This feature helps hide or blur confidential details shown on candidate ID proofs, ensuring that personal information is not fully visible when reports are shared or downloaded. This improves data privacy and helps maintain secure handling of candidate documents
- Enable ID proof expiry date validation - Enable ID proof expiry date validation to automatically verify the expiry date mentioned on candidate ID proof images. This helps ensure that the submitted ID documents are valid and not expired, improving the accuracy and reliability of candidate verification

- Require screen share - Enable this option if you want to capture the video feed of the candidate's screen recording while he was taking the test. The same will be made available in the monitoring report.
Enable full screen share:
Track if candidate is using full screen share during assessment.
Enable dual screen detection
Track if candidate is using second screen during assessment.

- Require webcam access - Enable this option if you want to record a video of the candidate to monitor the test for impersonation. The same will be made available in the monitoring report.
- Enable multiple face detection - Facial recognition to detect the presence of multiple faces in the candidate’s frame, ensuring the integrity of assessments by preventing unauthorized assistance during the assessment period.
- Enable face detection - Enable this option if you want to check face movement during the assessment.
- Enable audio tracking - Enabling this option helps you to flag all the instances where the candidate is talking to somebody or if any human voice is heard in the background.

- Enable candidate genuineness verification - Enabling this option will help you track suspicious activities through remote access to the candidate’s computer. It requires manual verification by the reviewer.

- Multi-Device Proctoring - After enabling all the above option, the candidate can still cheat using their mobile phones, enabling this option helps you to engage the candidate's mobile phone while they are taking the assessment.

- Track browser tab activity - Enable this option if you want to record the browsing history, URLs of sites opened, and the content if copy-pasted during the assessment.
- Limit leaving assessment area - Enable this option if you want to restrict the candidate to move out of the test area or limit the number of tab switches - put the relevant number in the box provided.

- Detect Duplicate IP profiles - Automatically detect if multiple candidate profiles are using the same IP address during the assessment. This helps identify suspicious activity and maintain assessment integrity
Note: If Proctoring is enabled then the candidate will not be able to proceed in the test without giving access to the camera and sharing the screen.
3. Timed Assessment

Turn the toggle button green if you want to time an assessment. There are two options:
- Question level timer - If you want to set the time to answer at the question level then select this option. The timer keeps ticking for individual questions, if the question is not attempted within the set time, the application will move to next question automatically. It is important to note that the candidate cannot go back to the previous question if this timer is set. This test can be paused and the candidate can come back later to take the next question if the time for the previous question has expired. When question level timer is set, the assessment does not auto-submit.
- Assessment level timer - You can set the duration of the assessment here, the timer will count down and go off when the candidate attempts the test.
- Disallow moving to previous question - Enable this option to prevent candidates from jumping to the previous question.
3. Video explanation for coding questions
You can enable this feature when you want candidates to explain the problem approach when they are solving any coding questions. This configuration can be enabled at the assessment level.

4. Glider Assist :
Glider assist helps with logic, algorithm and problem solving. Candidates basically can take help of AI for solving the coding questions and see if they are going in the right direction for solving the problems. This feature needs to be enabled at a company level.

5. Code Quality Analysis:
This checks how good the candidate’s code is based on certain parameters like correctness, performance, and style — beyond just passing test cases. This feature needs to be enabled at a company level.

6. Question skip restriction:
This allows candidates to skip questions, but requires all questions to be answered before submission.

7. Duplicate IP address:
This feature enables the system to identify instances where multiple candidate profiles are accessing or attempting the assessment from the same IP address. Such detection is useful in maintaining the integrity of the assessment process and helps flag potential cases of Impersonation.

8. Cut-off Score
Set a cut-off score to auto-disqualify candidates who score below the cut-off score

- Enter the score in the text box provided, candidates scoring below the set score will be automatically disqualified
9. Shuffle questions
If you want the question delivery order to be shuffled then turn this on

10. Available on mobile
Glider assessments can be taken on mobile by installing the Glider Screen app available on the Play Store and the App Store. Glider now supports MCQs, MSQs, Essay, and Video question types on mobile only for non-proctored test. Turn the toggle button on if you want the candidates to take the test on mobile.

11. Accessibility Support
For accessibility enabled assessment, only choose questions with Multiple choice, Multiple select ,True/False, Essay, Text entry, Text dropdown. 
12. Metacognitive Test
You can use this option to have insights about the score and candidate confidence level for each skill.

13. Diversity Hiring and Inclusion (D&I):
You can use this option to "Hide personal details of candidates."

14. Auto pick questions from the bank
Set up a bank of questions and turn on random delivery - Glider auto picks questions from the bank and delivers it to the candidates.

- You can choose to deliver all the questions from the pool by selecting the first option
- Deliver a specific number of questions from the pool by choosing the second option, enter the number of questions that have to be delivered in the text box
- If the assessment has questions from different groups or categories and you want to randomly deliver a specific number of questions from each group then select the third option. Enter theGroup Name, Question Numbers which belong to that group and the number of questions that have to be delivered from that group
- You can add more groups by clicking on Add New Group
15. Candidate Instructions
General instructions that are given to the candidates before the test starts can be filled in here.

- Glider has pre-filled list of instructions for the candidates, however, you can choose to add or remove from this list in the editor and create your own set of instructions.
- If the assessment contains a coding question please check the box Show coding assessment trial link so that candidates get acquainted with Glider’s coding platform before they start the test.
16. Disclaimer
This section serves as a disclaimer stage, wherein customers have the option to add their own disclaimers, which the candidate will have to agree to in order to proceed with the assessment. While the default text is provided in the attached screenshot, customers have the flexibility to customise the content in this section.

17. End of Assessment Message
This space is configurable, you can add messages which you want to convey to the candidates, after they have completed the assessment.
18. Company Message:
You can add images/ videos to be displayed to the candidate before the assessment. The admin can configure by adding images in profile settings.

19. Notifications
Once you invite a candidate, the candidates can communicate with the recruiter by replying back to the invite email, or request an extension using the link given in the invite email.
The recruiter who is inviting the candidate can choose to receive a notification whenever there is an update from the candidate. Also, it can be shared with specific team members and can also choose not to receive any notification.

Make sure to Saves Changes once the necessary settings are done.
Once you have saved your changes, Glider lets you configure how candidates can be invited to take an assessment.
Was this article helpful?
That’s Great!
Thank you for your feedback
Sorry! We couldn't be helpful
Thank you for your feedback
Feedback sent
We appreciate your effort and will try to fix the article